How to set payment integration in 123FormBuilder
You can set up payment integrations for your online order forms and start collecting money from your customers, as easy as 1-2-3! Assign prices to your items and set up discounts and fees. In this article, you will learn how to set up payment integrations.
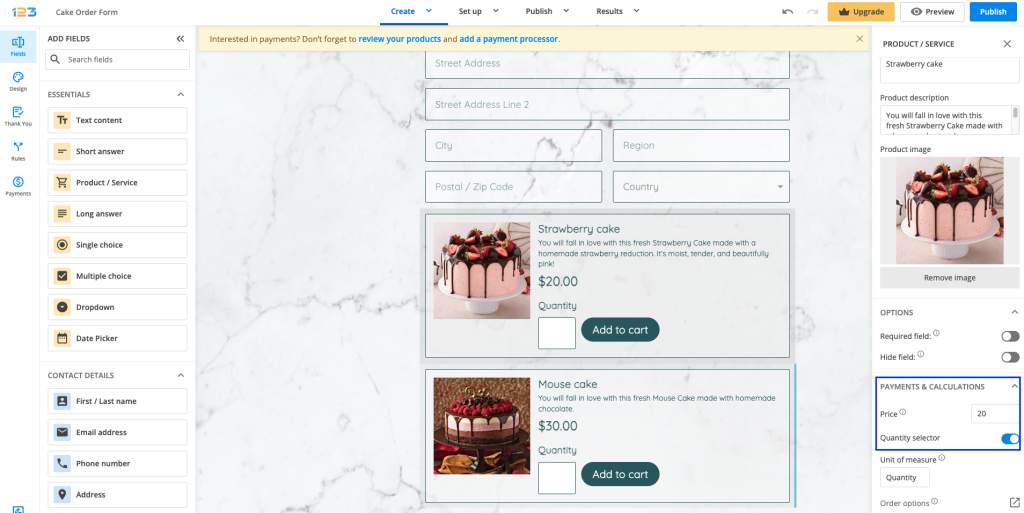
First, you need to assign the values to your products/services. To do so, add a choice field (Single/Multiple choice or Dropdown) or a Product field and list the available options in the form builder.
Click the field to open its options in the right-side panel and you can set the Price from Payment & Calculation section.
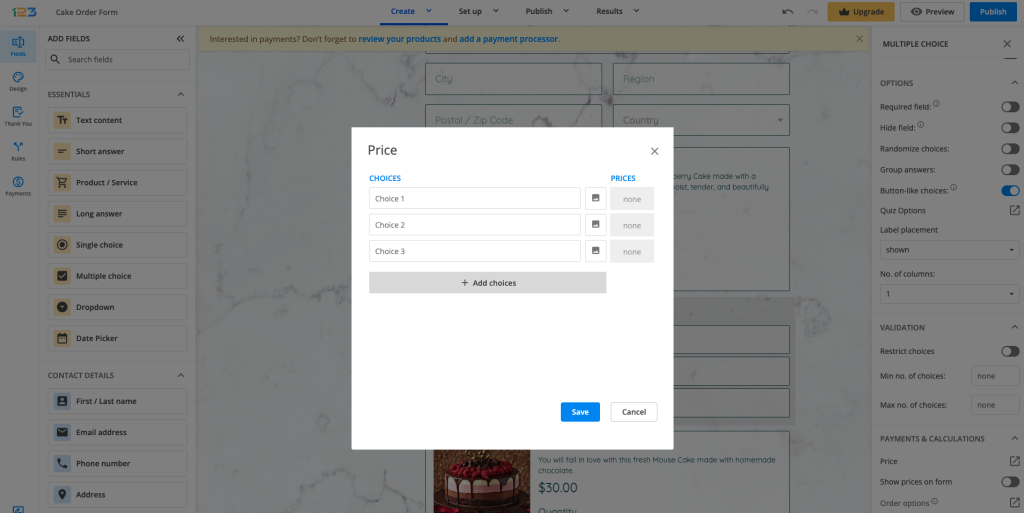
If you are using a multiple choice/single choice field, all you have to do is click on the Price under Payments & Calculation and assign prices for each choice.
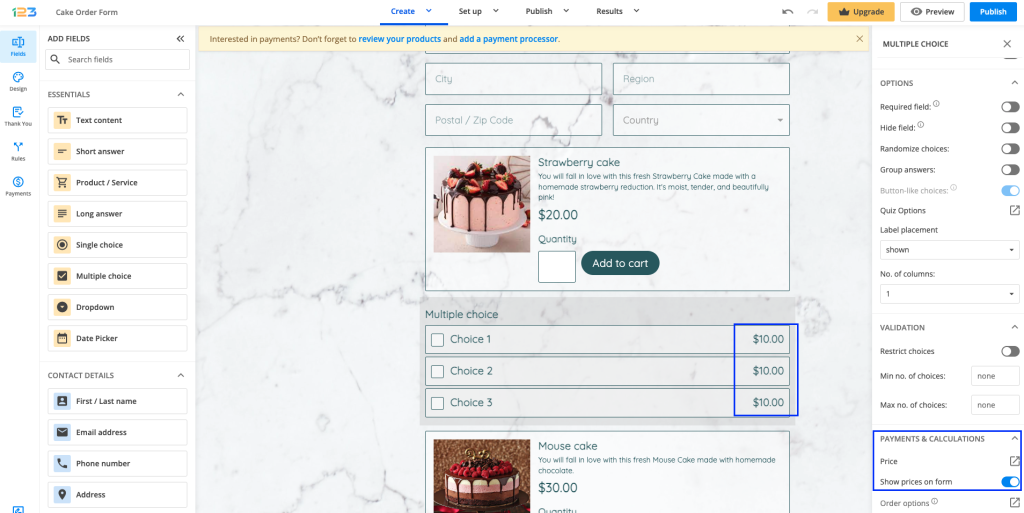
For the multiple/single choice fields, once you have saved the prices, they will be displayed near each choice, as Show prices on form is enabled. You can disable it if this does not fit your needs.
If you need the user to type in a custom amount, add a Number field and assign the value “1”.
The Number field also works as a quantity field. You can assign the price of the product to the field and the user can input the quantity.
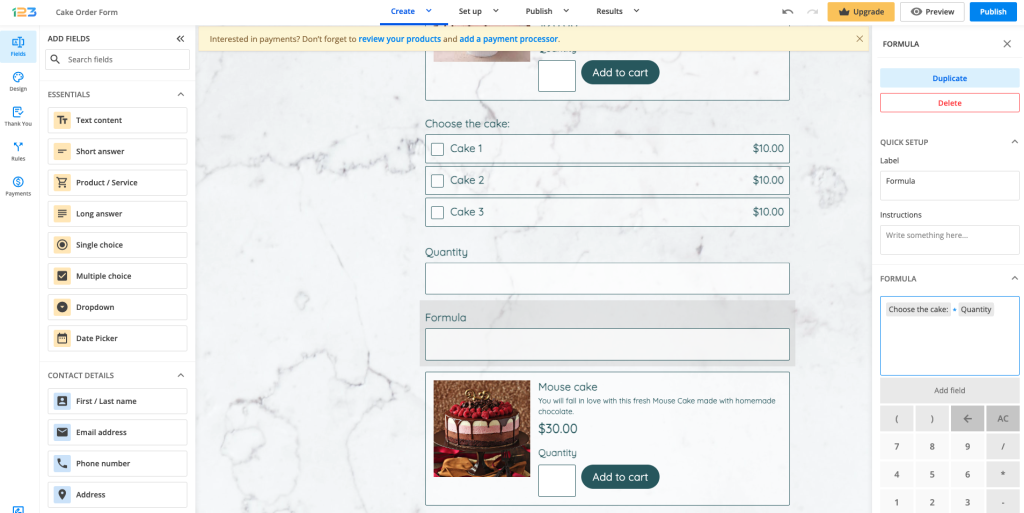
To create mathematical operations on your form, add a Formula field. Use the Add field button within the calculator to add your form fields.
After the calculation process is done, scroll to the last section of the Form Editor called Payments. Here you’ll find all the available payment gateways that you can add to your form.
Next, select your payment processor and provide the necessary credentials.
Once connected, at the bottom, a new section will appear – Order Summary. By clicking on it, you’ll notice some settings to the right-side panel.
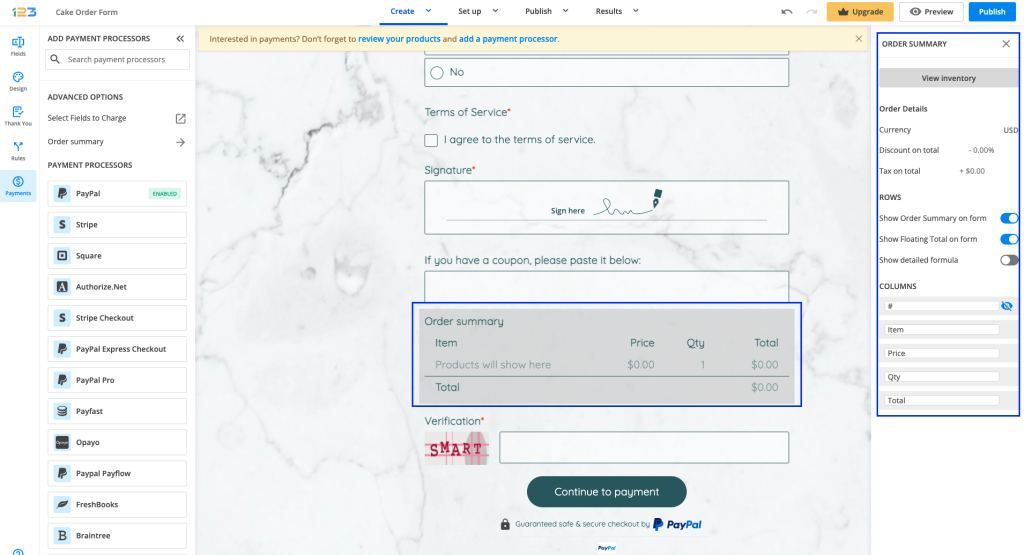
- Order details (set up the currency, discount on total, tax on total).
- Show detailed formula and Show discount & tax.
- Show order summary on form 0 Choose if you want your form users to review their payment options or not, before sending their entry.
- Columns. Here you have the freedom to rename the Payment summary table columns’ names.
After that, click on the View inventory button. A pop-up window will appear where you can see all the fields that have prices assigned. Determine how you want to calculate the total price.
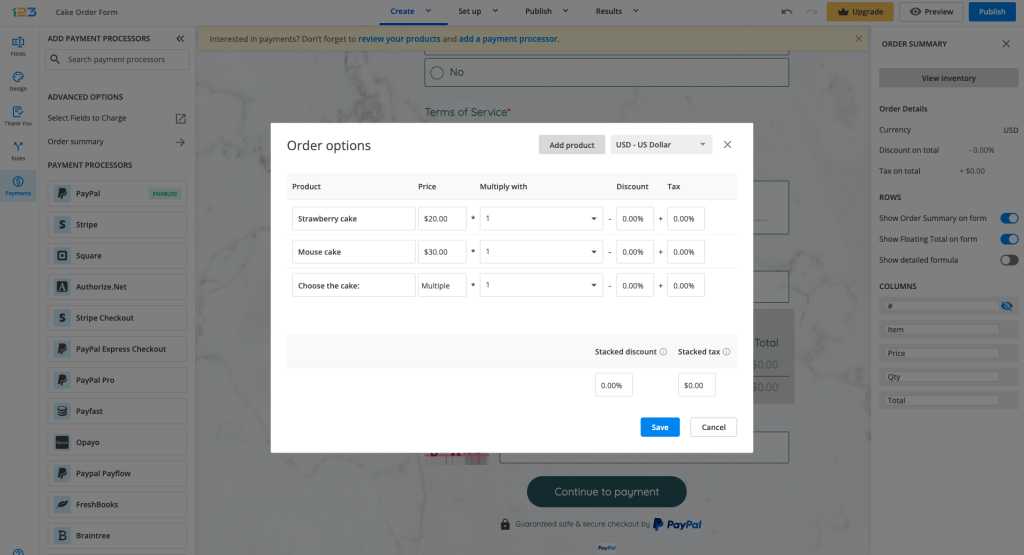
- Name. Here are all the fields that calculate the total price. Click the plus sign to add a new product.
- Price. This column will show you the actual price of the field or Multiple, Variable. Multiple means that you have multiple prices in that field. Variable is displayed when you have a formula.
- Quantity. By default, it is “1” (e.g the value assigned to the field: $154 x 1). However, you can also add a Number field in this column. This way, the price will be multiplied with the number inputted on the form. This works great when the form user needs to specify the quantity for a specific product.
- Discount. Here you can establish a discount for each field in percentage or a fixed amount.
- Tax. Similarly to the Discount option, you can add a tax for each field, either in percentage or fixed amount.
You can also change the currency you wish to accept payments in, by clicking on the Currency button.
Below is a list of all the payment processors that we have an integration with:
- PayPal Express Checkout
- Square
- Stripe
- Authorize.net
- PayPal
- PayPal Pro
- SagePay
- PayPal Payflow
- Braintree
- PayU
- FreshBooks
- Stripe Checkout
- Payfast
- Sisow
- Worldpay
- Civica
Related articles
10 comments
Leave a Reply
Your email address will not be published.
Similar Articles
Frequently Asked Questions
Here is a list of the most frequently asked questions. For more FAQs, please browse through the FAQs page.

Am I able to use Clover as a payment processor?
Hello Danielle, I am afraid not, you can use only one of the payment processors from the list presented in this article. Thank you!
How can I offer the option to pay now or pay later? My classes offer a free trial option, so not all users will want to purchase classes upon registration.
Hi Libby, I am afraid that it is not possible to schedule a payment for a later time. When you add a payment processor to your form, the payment is made on the spot. However, if your users select the trial option, you can use Form Rules to redirect them away from the payment processor. Please check our article on “Online and offline payments“ to learn more about this option. I hope this helps and please don’t hesitate to reach out if you need any assistance setting this up. Have a great day!
I don’t seem to be able to add tips to the Square integration payment process. How can I do that?
Hello Osbaldo! Square tips haven’t been included in our integration, however, there are ways to ask users for tips on your form. One solution would be to add a Number field, where users can input the tip amount they want to leave. If you need to tax users a certain amount based on their orders, you can add a percentual tax on the total amount in the Products section. If you need help setting up either option on your form, please feel free to contact us at customercare@123formbuilder.com or on live chat. Have a fantastic day!
Hi Karla
Thanks, the form redirection now works, but I’d prefer the user to see the form’s ‘thank you page’ as setup rather my designated URL redirection page – unless I can somehow carry across some of the form fields as you can when designing the HTML thank you page. Is this possible?
Thanks
Hi again Philip! Glad to know that the redirection works now. Unfortunately, it is not possible to forward user information from your form to your webpage, and with this specific form setup, you can only use the option to redirect users to a webpage. If you have any other questions, please don’t hesitate to reach out. Thank you!
Hi
I want to give my users the option of either proceeding to the payment gateway or to be emailed an invoice.
I’ve tried form rules but no matter what I do, the final button (eg. submit) always opens the Stripe gateway.
Is this possible to resolve (I don’t use CSS)?
-Thanks
Hi Philip! Have you followed the steps from this article? Please also make sure to tick the option “Enable rules for this form” after you create them. If you’re still redirected to Stripe after setting up the form, please contact us at customercare@123formbuilder.com so we can further investigate this situation. Have a great day!