Introducing the New “Schedule” Feature: Tailored Form Status Setup for Enhanced Accessibility
Online Forms are vital for gathering data, driving user engagement, and simplifying processes across many digital platforms. 123FormBuilder proudly launches the new “Schedule” section, elevating form management to a new level. This feature empowers users with enhanced control over the status of their forms, streamlining the overall experience.
Spotlight on the ‘Schedule’ Section
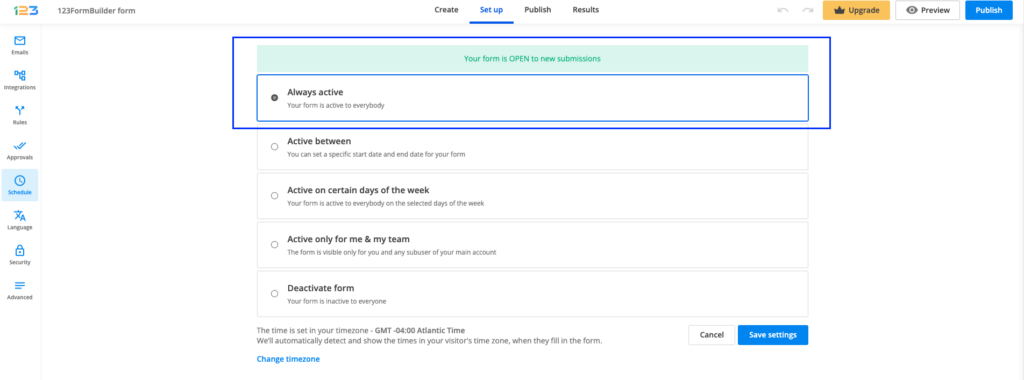
Positioned conveniently under the “Set up” tab, the “Schedule” section has been introduced to offer users a more nuanced way to control when and how their forms are accessible.
Default Settings: Always On
Every form, by default, is poised to be always active. You’ll immediately spot an informative banner when you hop into this section. This banner clearly states: “Your form is OPEN to new submissions.”
Delving into the Five Form Status Settings

1. Always Active
This is the go-to option for those who want their forms always available. There is no need to constantly monitor or make manual changes; once it’s set, the form remains accessible indefinitely.
2. Active Between
Seasonal promotions, time-bound surveys, or event-specific signups: there are countless situations where you’d only need a form to be active between two dates. This setting ensures the form becomes available when you want and disappears right when it’s supposed to.
3. Active on Specific Days
You may be conducting a weekend poll or a Wednesday-only flash sale. By selecting which days of the week your form should be active, you cater to particular needs without the hassle of manual activation or deactivation.
4. Active Only for Me & My Team
Collaboration is critical in today’s digital age. With this setting, forms can be exclusively accessed by the creator and their designated sub-users. This can be useful for internal communications, team feedback mechanisms, or pilot testing.
5. Deactivate Form
Sometimes, you might need to pull a form out of action for various reasons. Whether for updates, data analysis, or any other reason, this setting ensures your form is inaccessible, thus preventing any new submissions during deactivation.
Tailoring Your Form’s Active Window with “Active Between”
For those situations where a constant form presence isn’t needed, choose the ‘Active between‘ option. Here’s a step-by-step guide to ensure precision:
- Selection: Begin by picking ‘Active between.’ This reveals options to specify the start and end times for your form’s active period.
- Calendar Tool: A handy calendar icon lets you quickly pick the desired dates and times. Clicking on it allows you:
- Day: Navigate to your preferred day by clicking on it. However, remember that the start date must precede the end date. If you’ve picked the 13th of October as your start, dates after this will be grayed out for end date selection.
- Month & Year: Dropdown arrows for both month and year make it easy to jump to any specific time.
- Time: Adjust the hour by scrolling or inputting your desired time directly.
Message to Responders
What do your respondents see when they access an inactive form? The Schedule section takes care of this, too! By default, a preset message informs users that the form is inactive. However, you can modify this text at will. Once saved, respondents will see the updated message during the form’s inactive periods.
Saving and Tracking Changes
Once you’ve tailored the settings to your satisfaction, saving these adjustments is vital. Click on the ‘Save settings’ button. Once this is done, the banner at the top will reflect your new settings, ensuring you can easily glean the form’s current status.
Harnessing the Power of Scheduled Forms for Appointments
The significance of efficiently scheduling appointments cannot be overstated; whether for a consultation, service booking, or an internal team meeting, the ability to seamlessly schedule is paramount. This is where the newly introduced “Schedule” feature can play a transformative role.
Amidst its many functionalities, the “Schedule” section’s flexibility is perfect for appointment forms. Imagine you run a consultation service available only on specific days or times. With the “Active on Specific Days” or the “Active Between” settings, you can ensure that your appointment form is only accessible during your working hours, helping to automate your scheduling process.
Moreover, for internal team meetings or events where only specific members need to fill out a form, the “Active Only for Me & My Team” setting comes into play. This ensures that the form remains exclusive, maintaining the appointment or event’s integrity and purpose.
But there’s more. The precise date and time customization offered by the “Active Between” option means you can adjust your availability for appointments based on holidays, personal commitments, or any other reason that may arise.
In essence, the “Schedule” feature offers a refined form management experience and provides a dynamic solution for tailored appointment scheduling. Businesses and individuals can achieve an enhanced, efficient, and user-centric scheduling process by integrating this with appointment forms.

